How to add variant metafields in Shopify: The ultimate guide

Figuring out Shopify so you don't have to: a bit about me
Hi! I'm Kat, part of a team that's built a Shopify product management automation tool. I'm creating my own Shopify store to understand daily operations firsthand. Our customer feedback is valuable, but hands-on experience will enhance future product features. I love learning and doing things right, so I'm sharing what I've learned, best practices and my implementation to help other people learn about creating a Shopify store.
I'm back with a rather niche topic today: how to add variant metafields in Shopify. I've been down a rabbit hole learning everything there is about this and I'm eager to share it with you, especially as it relates to automated product management and Shopify variant management.
Metafields are a great feature that let you add custom data fields to various parts of your store. Adding extra details to your products using metafields is super valuable because it will help you to bring in more customers through better product information management.
In this comprehensive guide to Shopify variant metafields, I will explain what metafields are, how to use them (with a particular focus on product variant metafields and Shopify metafield automation), and how they can help you to provide rich information to your customers.
Table of contents
What is a metafield and how do I use it?
A metafield in Shopify is essentially an extra field where you can store specialised information that's not captured by Shopify by default. It's basically a custom data slot that you create that can hold text, numbers, images, URLs, or a range of other data types. Metafields can be attached to many parts of your store, including products, collections, customers, orders, and product variants. When combined with bulk product management tools, metafields become even more powerful.
Why this matters
Metafields allow you to provide detailed product information that drives purchase decisions. Studies show that 76% of shoppers are more likely to buy when provided with detailed product specifications relevant to their needs. This becomes especially important when you manage thousands of products on Shopify.
For example, a candle retailer might use a metafield to record a candle's burn time, or a grocery store might add an expiration date metafield for perishable goods. Other common uses include storing things like part numbers, size guides, ingredient lists, or any product detail not covered by Shopify's standard fields. With proper product data enrichment, these fields can significantly enhance your store's value.
Metafields, the TL;DR:
Metafields allow you to add custom data fields to your Shopify store that aren't available by default, helping you tailor your store to your specific business requirements.
Clarifying why we use variant metafields instead of further product variants
Your product variants are different versions of a product available for purchase. Shopify uses these to create separate SKUs, prices and inventory tracking through its product catalogue management system.
Metafields, on the other hand, store additional information about each of these variants. This information doesn't determine which variant a customer selects, but provides crucial details about that specific variant through enhanced product description automation.
For example, while a customer chooses between RAM and storage options (variants), each configuration might have different processor speeds, battery life, or weight specifications (metafields) that change depending on which variant is selected. This creates a more accurate and detailed shopping experience without cluttering your main product description with every possible specification combination. For stores using Shopify automation tools, this distinction becomes even more critical.
Why use variant metafields instead of additional variants?
Adding every specification as a variant would create an unmanageable "variant explosion" with potentially hundreds of combinations that exceed Shopify's limits, complicate inventory management, and overwhelm your prospective customers. This is where automated bulk editing becomes essential.
Most shoppers primarily select based on a few key attributes (like RAM/storage) and then review the specifications of that selection.
Variants should be reserved for 1-3 critical options that customers actively choose between, significantly affect pricing, and require distinct inventory tracking.
Variant metafields provide a streamlined solution for displaying important secondary details that change with each variant without forcing customers to navigate through excessive dropdown menus or invalid product combinations. This approach is particularly valuable when you scale your Shopify store.
Steps involved in using metafields in Shopify:
- Define the meta field – First, you need to create a metafield definition to specify what kind of data the field will hold (e.g. text, number, file, etc.) and give it a name/key.
- Assign values – Next, you need to fill in the metafield value for each item (for example, each product or each variant) via the Shopify admin or through bulk metafield editor tools.
- Display in your store – Lastly, you need to connect the metafield to your theme, either through the theme editor or by editing your theme code, so that customers can see this information on your storefront.
This comprehensive guide focuses specifically on variant metafields – metafields attached to individual product variants. For those using bulk product updates on Shopify, understanding variant metafields is crucial for efficient management.
Shopify also supports metafields for whole products, collections, customers, orders, and more, but those are outside our scope here.
By the end, you'll know how to set up variant metafields, populate them with data (including through Shopify bulk operations), and use them in your theme, with examples for both beginners and developers.
Summary
Metafields are custom data fields that extend Shopify's standard functionality, allowing you to store specialised product information like burn times, expiration dates, or technical specifications. They require three steps: defining the field, assigning values, and displaying them in your store. Studies show 76% of shoppers are more likely to purchase when given detailed product specifications.
Understanding Shopify variant metafields
Variant metafields are metafields that are associated with a specific product variant rather than the product as a whole. If your product comes in multiple versions (like different sizes, colours, or styles), variant metafields let you store information unique to each of those versions. This is different from a product metafield, which would apply to all variants of a product. When combined with product listing automation, variant metafields become a powerful tool for managing complex catalogues.
- A product metafield is shared across all variants. For example, if you add a product metafield "Fabric" to a t-shirt product, all variants (small, medium, large) will show the same fabric info.
- A variant metafield is specific to one variant. For example, you might have a metafield "Chest measurement" that varies for each size variant (Small: 91 cm, Medium: 96 cm, Large: 102 cm).
Extending variants beyond Shopify's standard fields
In Shopify's data model, a product variant already has some built-in fields like price, SKU, inventory quantity, image, etc. However, you may need to store additional variant-specific data that Shopify doesn't provide out of the box. Variant metafields fill this gap. They allow you to extend product variant data beyond the basics, particularly useful for automated product categorisation.
For instance, if you've got a t-shirt you want to sell in multiple colours. You could create a variant metafield for "Care Instructions" so that the washing instructions for the red shirt variant can be different from those for the white shirt variant. Or, if you sell a phone in different storage options, a variant metafield could store the battery life for each specific model (since perhaps the 128GB model has a slightly different battery spec than the 256GB model). This level of detail is crucial for Shopify SEO automation and improved product discovery.
Important: Why not just use product metafields for everything?
Because if the information should change when a customer selects a different variant, it belongs in a variant metafield. If it stays the same no matter which variant is chosen, a product metafield makes more sense. By using variant metafields appropriately, you ensure customers always see information that corresponds to the exact variant they're looking at, leading to a more accurate and personalised shopping experience, more leads, and more purchases. This is especially important when using Shopify automation UK solutions for large catalogues.
Summary
Variant metafields store information specific to individual product variants (e.g., different measurements for each size), unlike product metafields which apply to all variants. They're essential when information changes based on which variant a customer selects, creating a more personalized and accurate shopping experience that can lead to more purchases.
How to set up variant metafields in Shopify
Setting up variant metafields involves two main steps: creating the metafield definition (the field setup) and adding values to that field for each variant. Shopify has made this process much easier in recent versions of the admin, and with Shopify product automation tools, you can manage these at scale.
Note: Shopify does have a selection of inbuilt metafields. You can use these if required but they don't always hit the mark, so I will show you how to add a custom variant metafield. The store I'm setting up is for computers, laptops, parts and accessories, so I'll be showing you this with a HP Laptop. I'll take you through what you need to do, step by step.
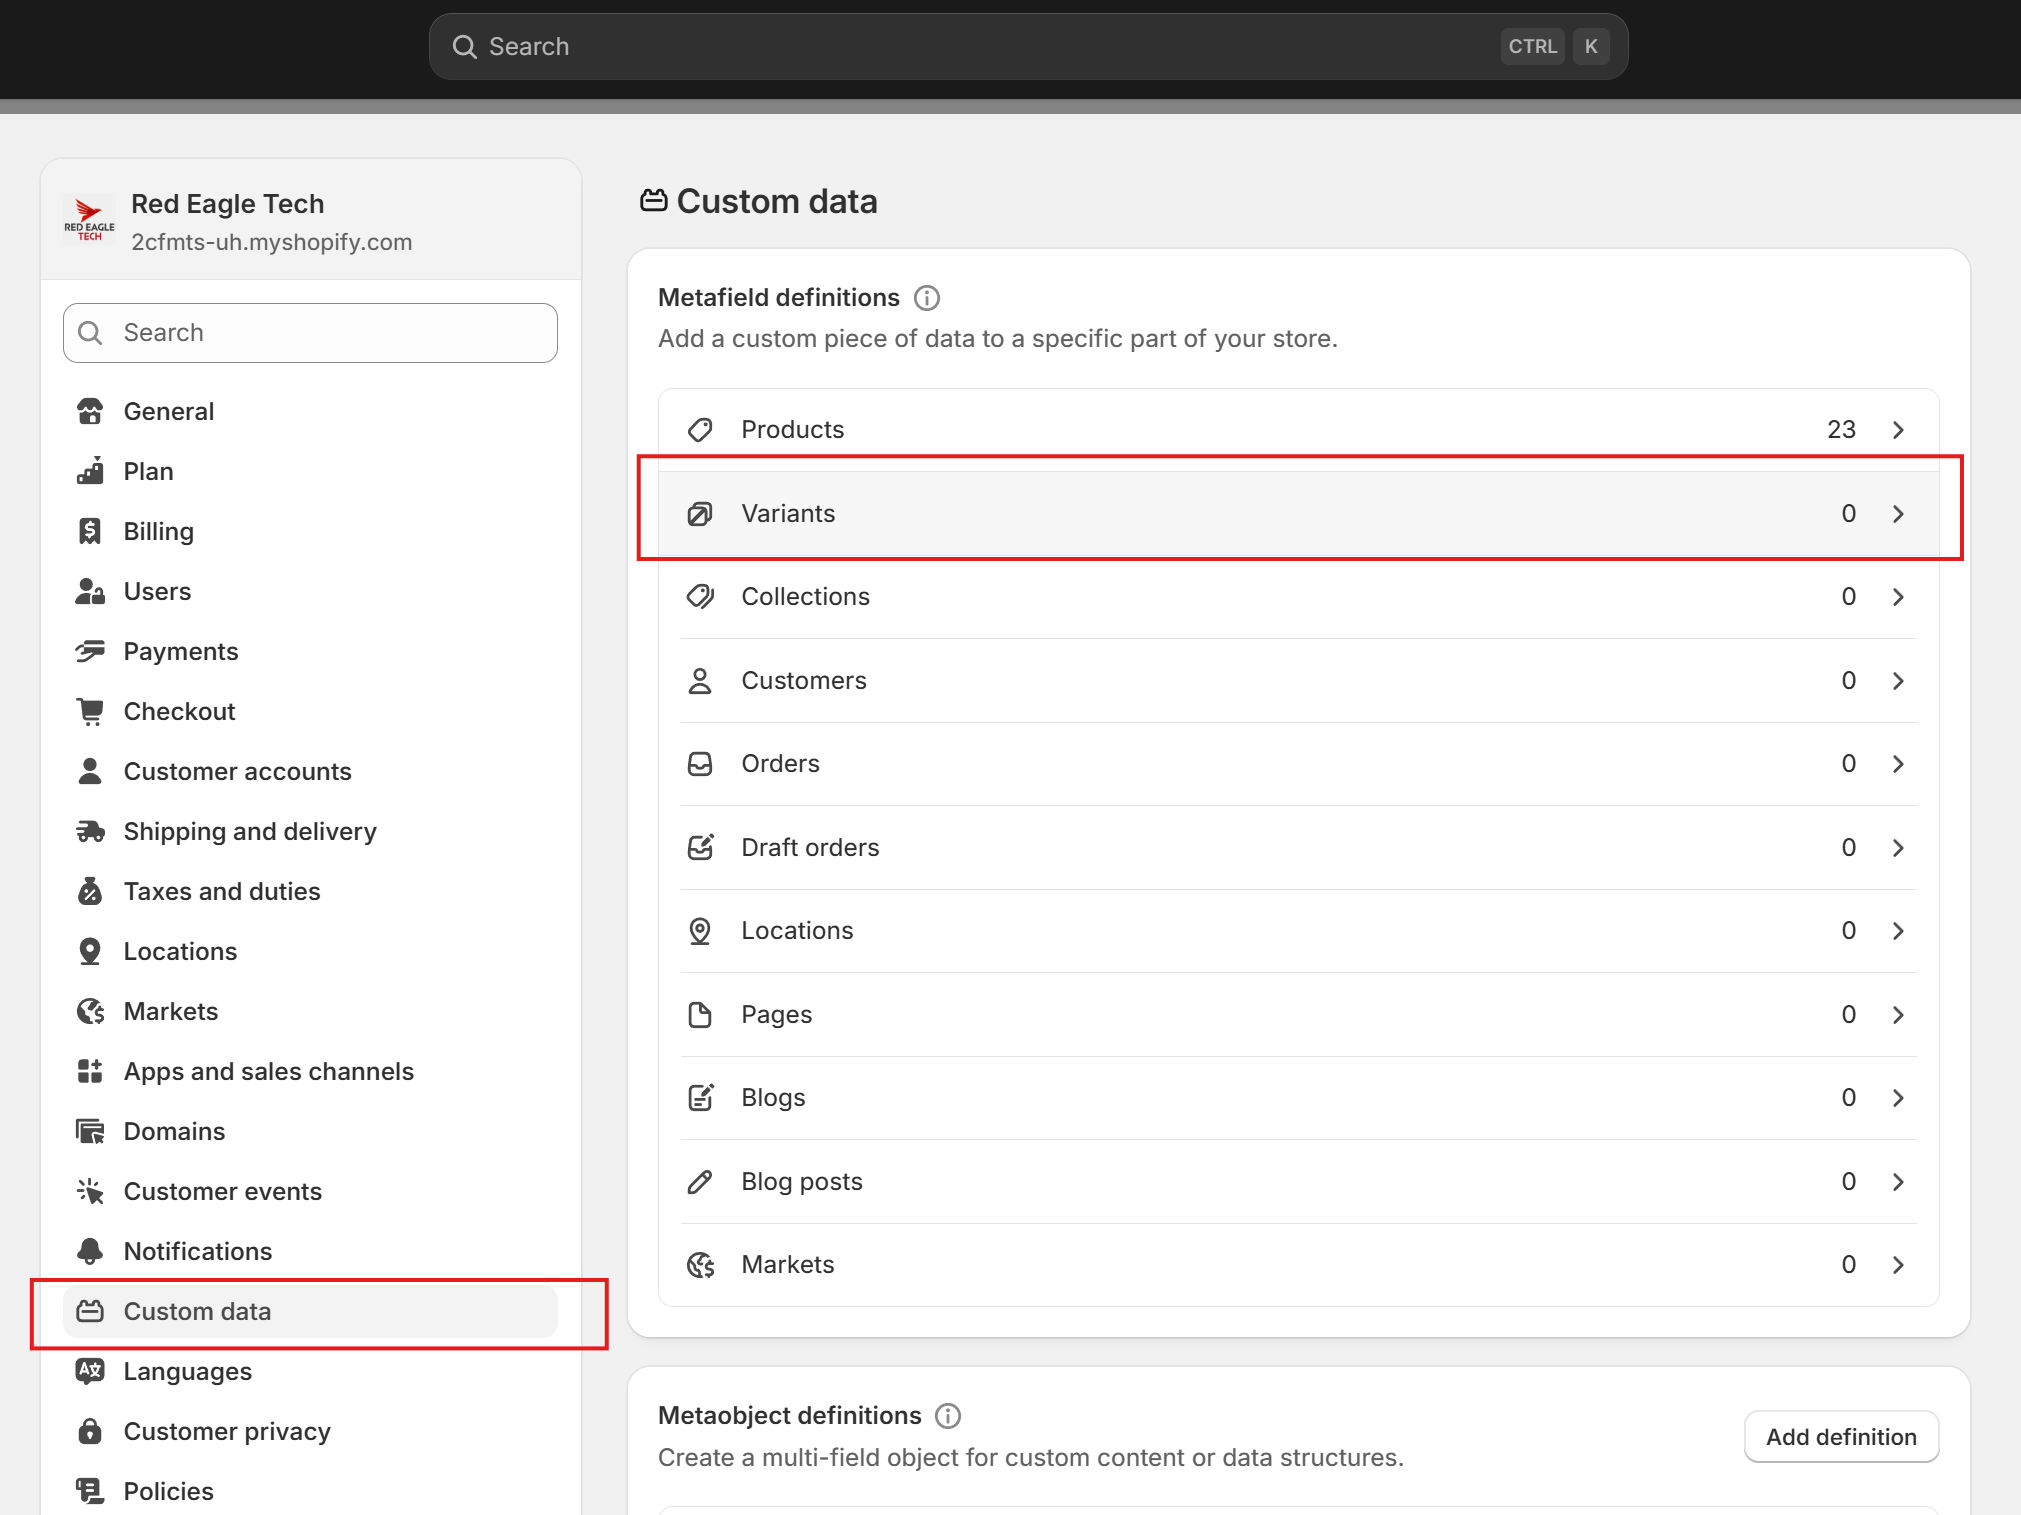
Step 1: Create a variant metafield definition
-
Navigate to Variant Metafields in Admin: Log in to your Shopify admin and go to Settings > Custom Data (or Metafields in older labels) > Variants. This is where you manage metafield definitions for product variants.
-
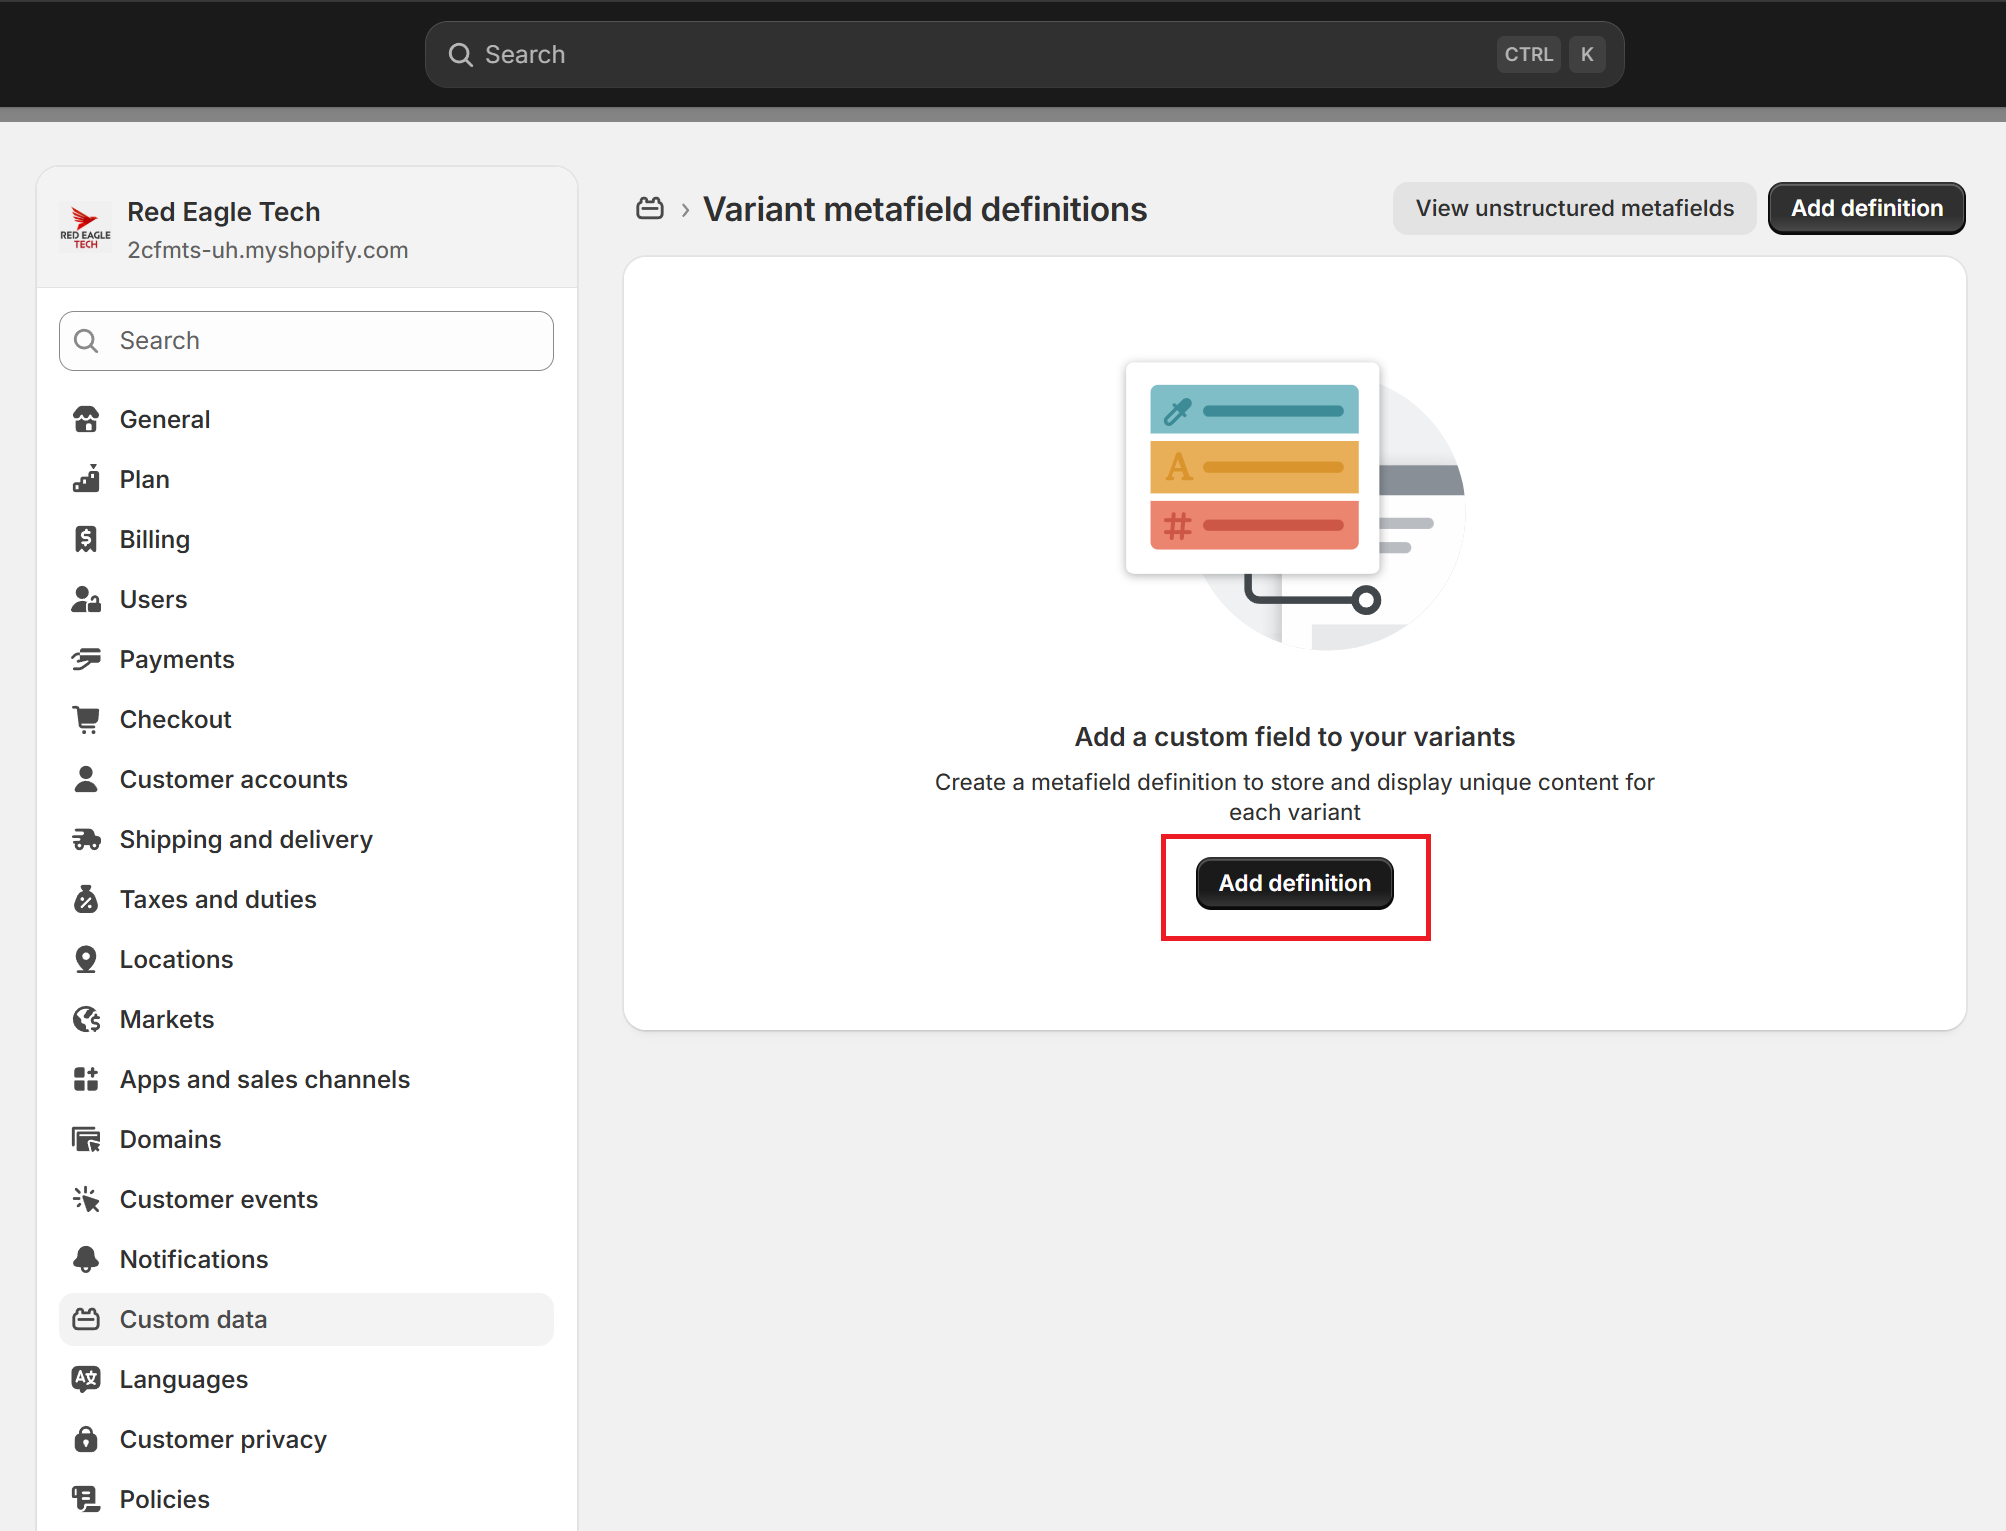
Add a new definition: Click the "Add definition" button. You'll be prompted to enter details for your new metafield definition.
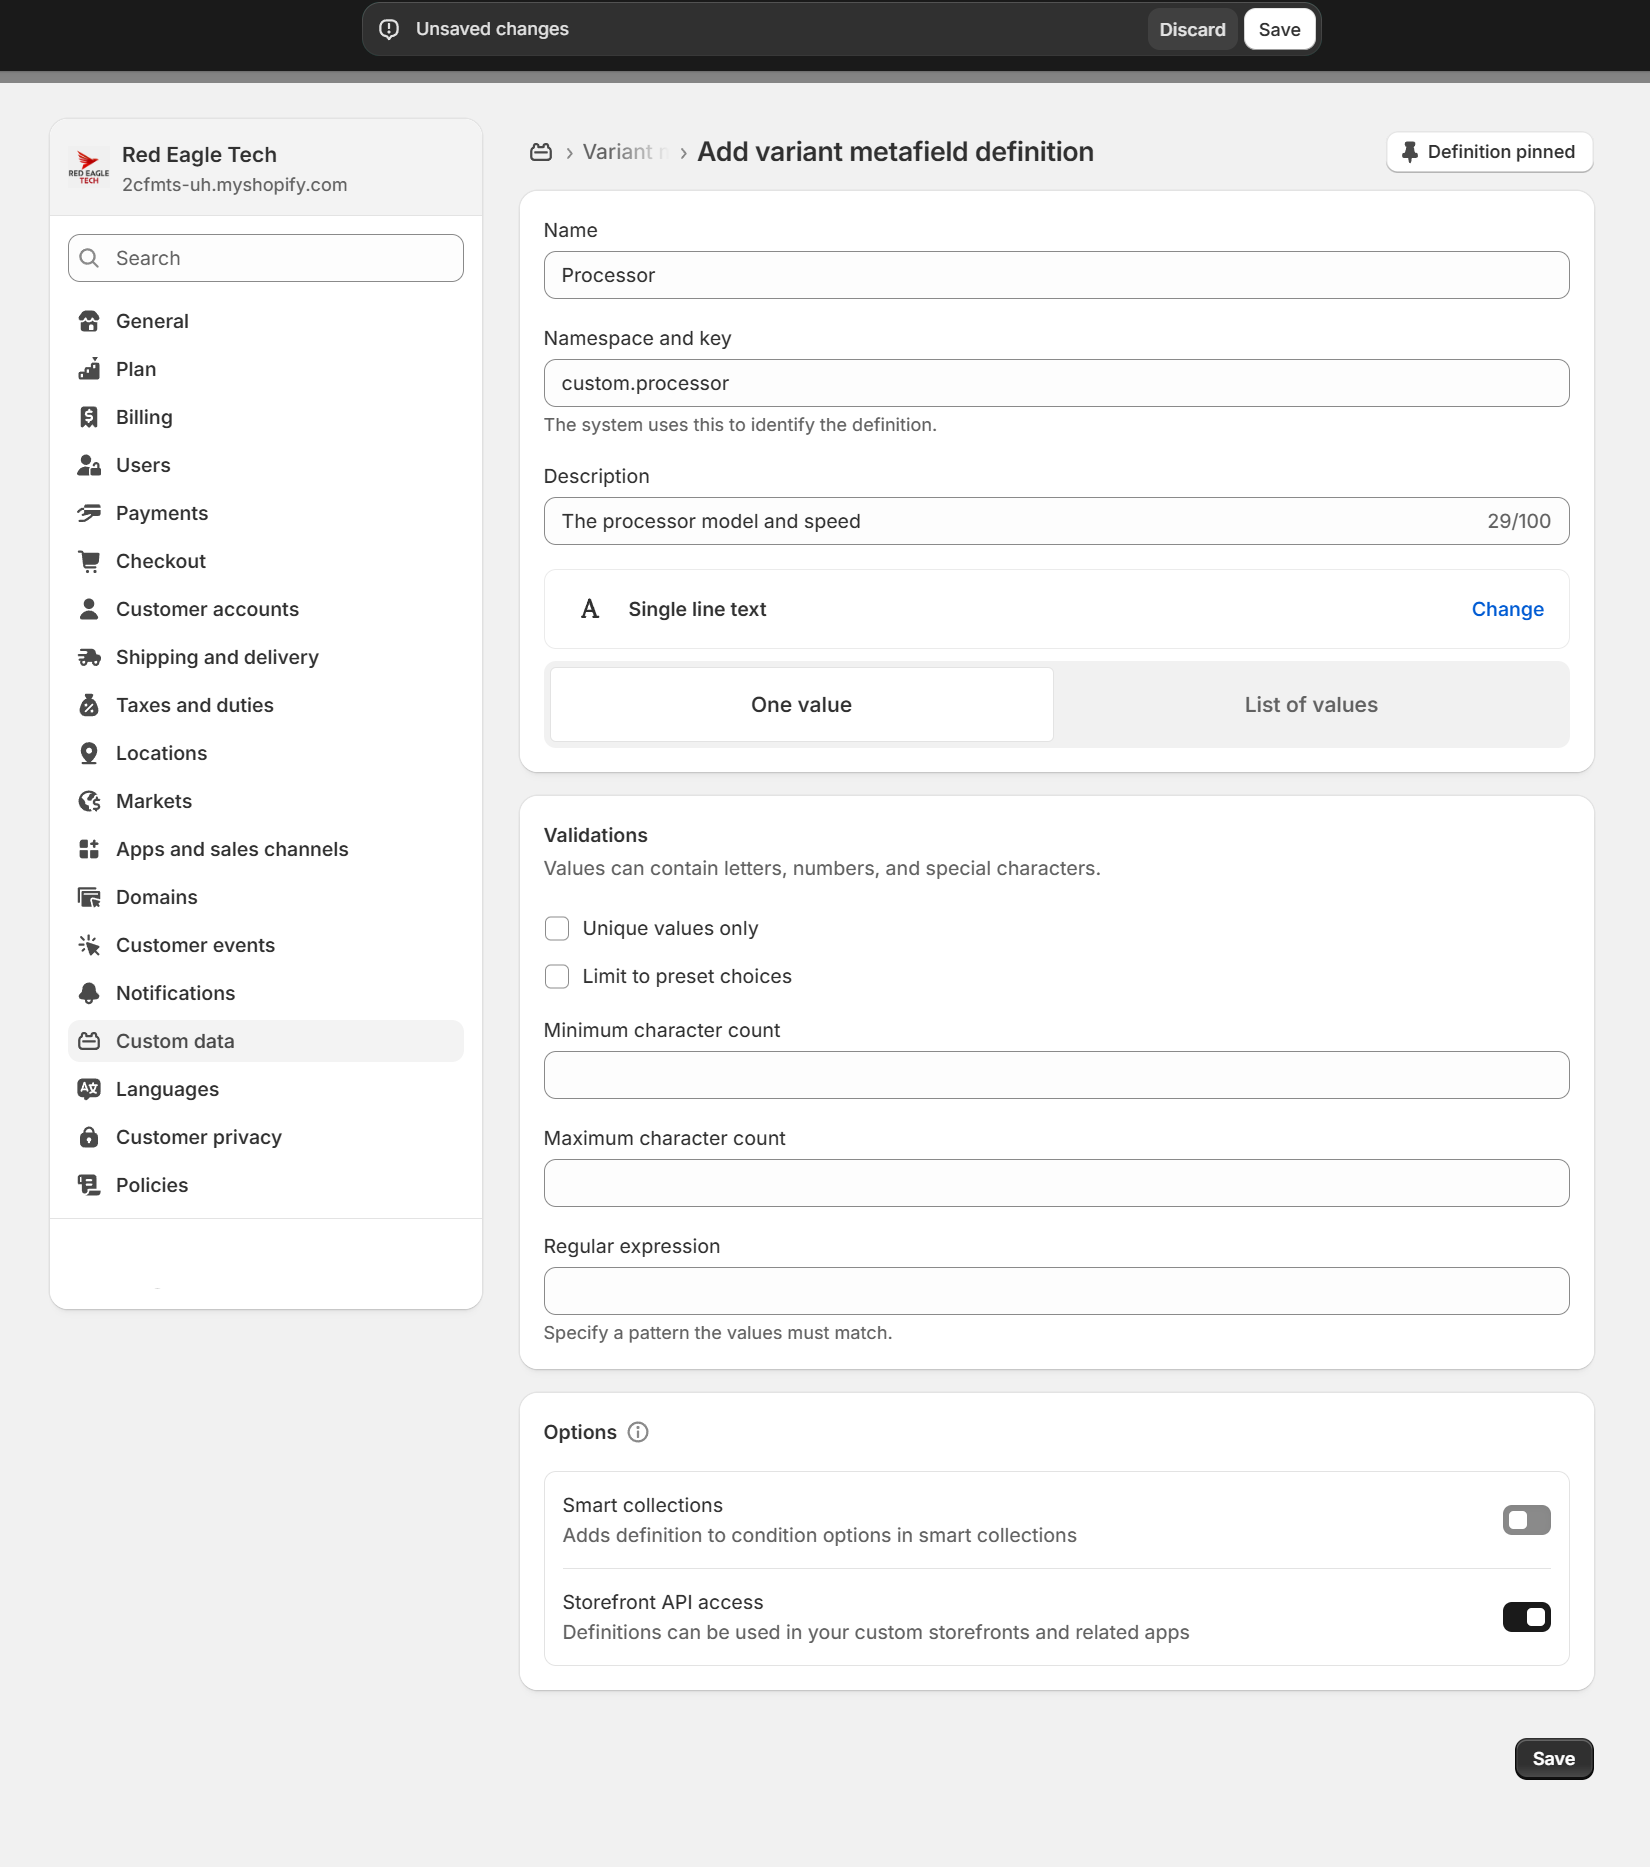
Name your metafield: Give it a clear name (e.g. "Ingredients list" or "Technical spec"). I've added Processor and Graphics card in my example. Shopify will auto-generate a Namespace and Key based on this name. You can typically leave these as-is. For example, if you name it "Processor", Shopify might set the namespace to custom and the key to processor. These identifiers are used in code when displaying the metafield on your storefront.
Add a description (optional): Write a short description to help your staff understand what to enter. This shows up in the admin when editing the metafield value. For example: "The processor model and speed" for a processor metafield. This becomes especially helpful when you use bulk product editing on Shopify.
-
Choose the content type: Select the type of content this metafield will store. Shopify offers many options – choose the one that best fits your data:
- Single line text (for brief information like processor models - I chose this one)
- Multi line text (for longer descriptions)
- Integer (for whole numbers)
- Decimal (for numbers with decimal points, like weight)
- Boolean (true/false, for features that are either present or not)
- URL (for links to additional resources)
- File (for images or PDFs)
- Product reference (to link to another product)
-
Select value format:
- One value: Choose this for specifications where each variant has only one value (most common)
- List of values: Only use this if a variant might have multiple values for this field
-
Set validations (optional):
- Unique values only: Check if each variant must have a different value
- Limit to preset choices: Use to create a dropdown of specific options
- Minimum/Maximum character count: Set length limits if needed
- Regular expression: Define a specific format pattern if required
-
Configure options:
- Smart collections: Enable if you want to use this metafield for creating automated collections through Shopify collection automation
- Storefront API access: IMPORTANT - Make sure this is enabled (toggled ON) if you want the metafield to appear on your store
-
Save the definition: Click Save. You've now created a variant metafield definition, meaning the field exists and is ready to hold data on each variant. You can see my example in the screenshot below.
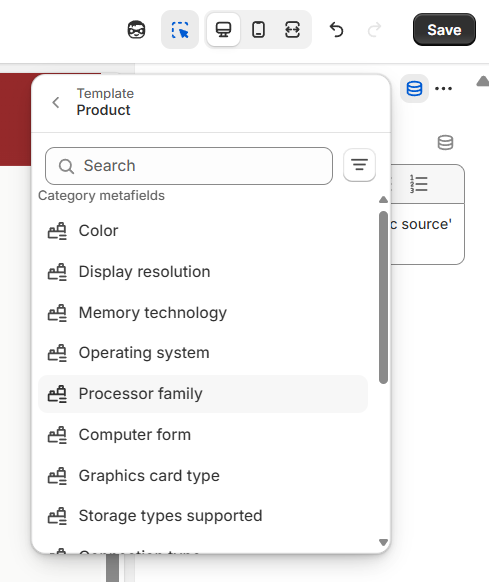
Shopify's standard metafields: A time-saving feature
You'll likely notice Shopify offers recommended standard metafields based on your product category. For electronics and computers, you'll see options like "Processor family," "Graphics card type," and "Memory technology" without having to create them yourself. These standard metafields help improve SEO, enable better product filtering, and maintain consistency across your store.
You can use these predefined options alongside any custom metafields you create for specific business needs. This intelligent feature saves significant setup time and ensures your product information structure follows e-commerce best practices. Simply select the relevant standard metafields from the list when connecting them to your variants, then add your product-specific values as normal. The screenshot below shows the standard category metafields that were recommended to me. This is particularly useful when you need to manage thousands of products and want to maintain consistent data structure.
Step 2: Add values to your variant metafields
Now that the variant metafield is defined, you need to connect it to your variants and add values. Here's how (including tips for bulk variant editor approaches):
Open a product with variants: From your Shopify admin, go to Products and select a product that has variants (or create variants if you haven't already).
Navigate to the Variants section: On the product detail page, scroll down to the Variants section where you can see your product options (like RAM and Storage).
Click the + Add variant button: Look for the +Add variant button and click on it.
Select the variant you want to add the metafield to:
-
Add values for each variant combination: After connecting the metafield, you'll be able to enter specific values for each variant combination. For example:
- For a laptop with 8GB RAM + 256GB SSD: "Intel Core i3-1215U, 3.3GHz"
- For a laptop with 16GB RAM + 512GB SSD: "Intel Core i5-1235U, 4.4GHz"
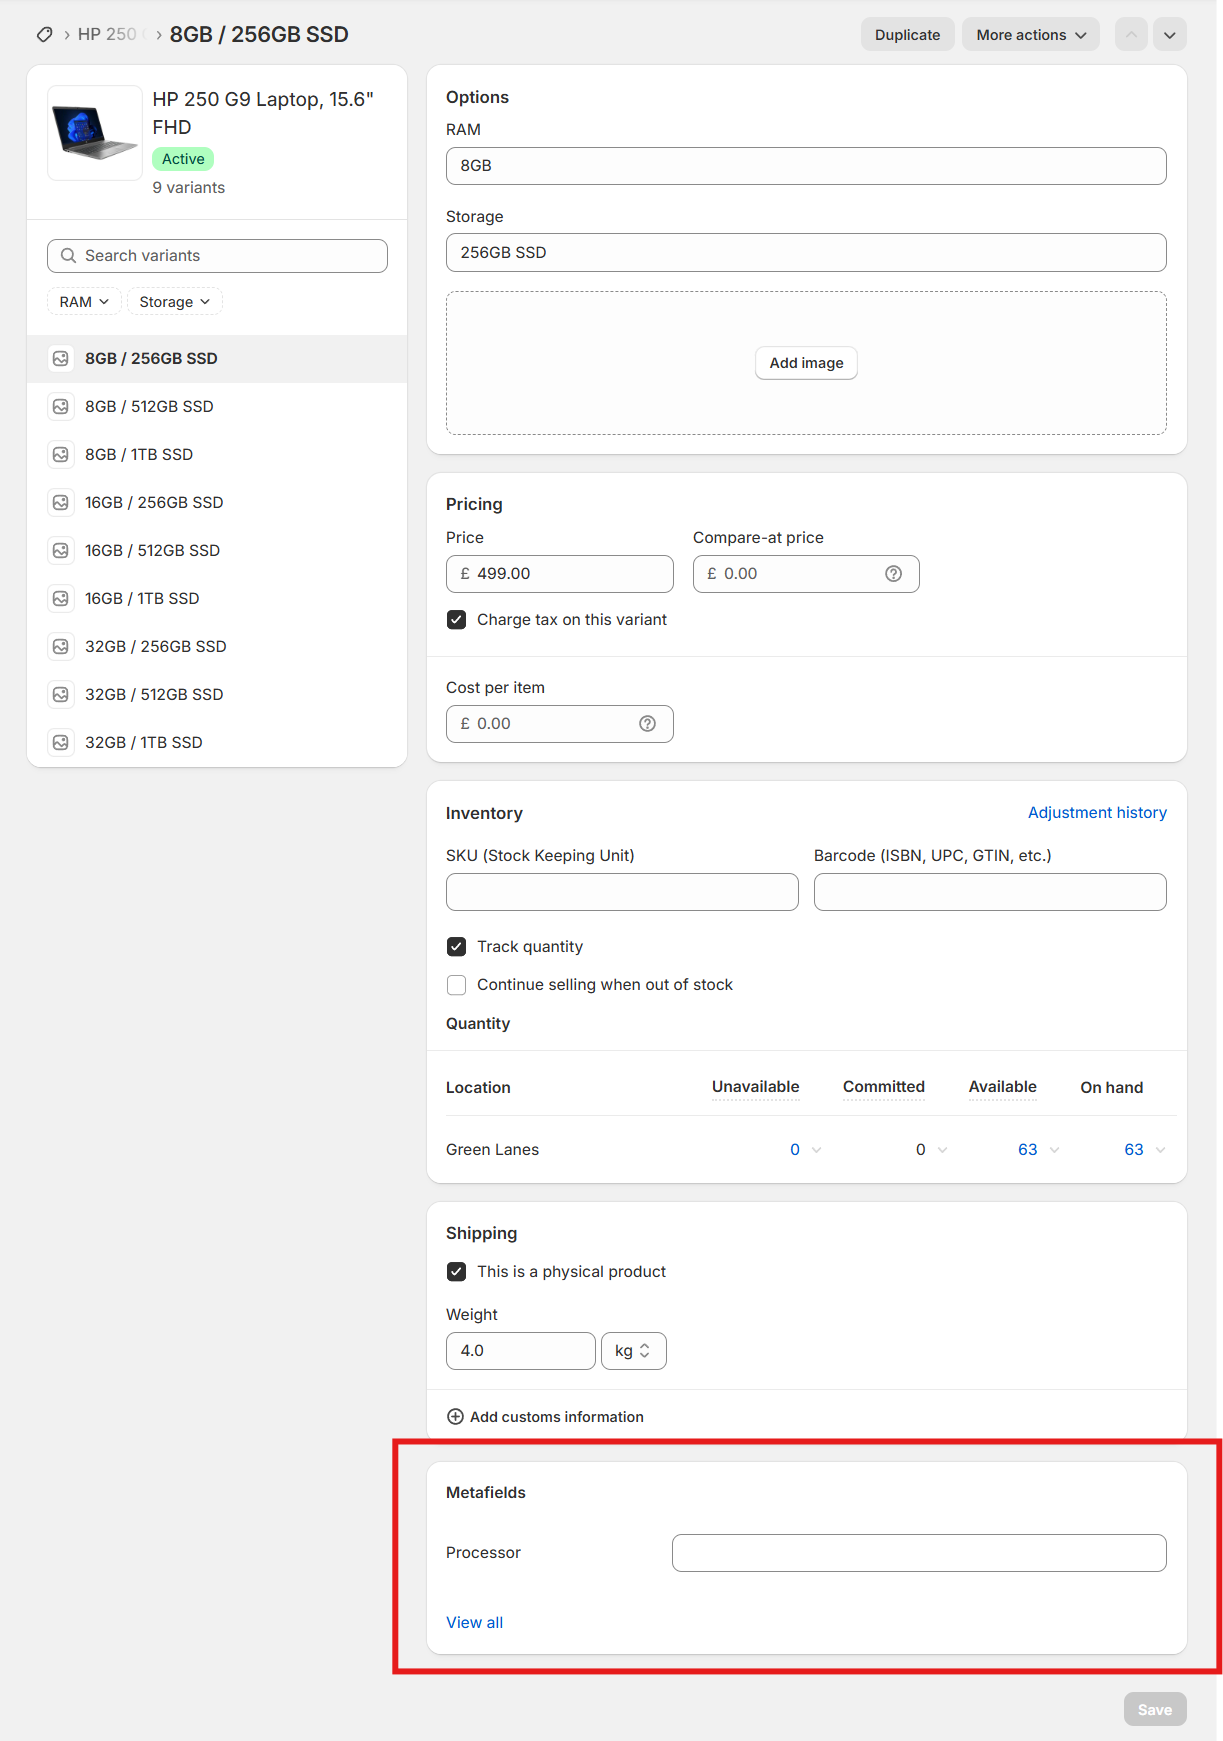
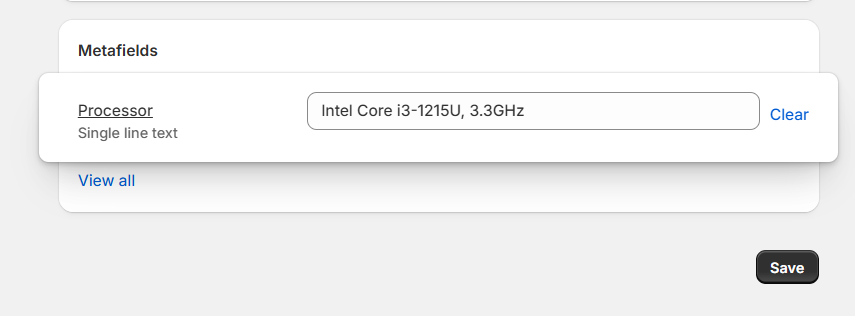
Save the product: After entering all the values, click Save to store the metafield values for each variant.
Repeat for additional metafields: If you have other metafields like "Battery Life" or "Graphics," repeat the process by clicking the "Connect metafield" button again and selecting the next metafield.
Time-saving tip
For products with many variants, you can use the bulk editor to update multiple variants at once. From the Products page, select multiple products, click "Edit products," and you'll see options to edit metafields in bulk. This is particularly useful when dealing with Shopify bulk product updates.
For stores with large product catalogues, consider using MeldEagle's product automation for Shopify to automate your metafield management, reducing hours of manual work to just minutes. This automated approach ensures consistency across your entire catalogue and eliminates manual errors.
As I've shown you in this example, technical products like electronics benefit greatly from variant metafields. For a laptop that comes in different configurations, each variant might have distinct technical specifications that customers need to see. Imagine one variant has 8GB RAM and a 2.5GHz processor, while another has 16GB RAM and a 3.0GHz processor. You could use metafields like "RAM", "Processor Speed", "Battery Life", etc., to store these specs for each variant. Then, on the product page, display the specs of the currently selected variant so customers see the exact details of the model they're considering. This approach is much clearer than listing all possible specification combinations in a single product description and is essential for effective product information management.
I will walk you through how to display variant metafields in your Shopify store soon, but first let's have a brief look at some practical use cases for variant metafields in case you'd like to know more about how you could use them.
Jump to how to display variant metafields in your Shopify store
Practical use cases for variant metafields
To spark some ideas, here are a few practical ways store owners use variant metafields. These examples illustrate the kind of information you might store at the variant level, particularly useful when you expand your product range on Shopify:
Size-specific details (Size guides)
If your product variants represent different sizes, you can store size-specific information in each variant's metafields. For example, a clothing store might have a metafield for a size chart image or detailed measurements for that specific size. When a customer selects "Large", you could display that variant's exact dimensions or a link to a size chart tailored to large size. This ensures accuracy if sizing differs between variants (especially useful if, say, a unisex medium has different measurements than a women's medium). This level of detail is crucial for reducing returns and improving customer satisfaction.
Ingredient lists or components
If variants correspond to different flavours, colours, or materials, each one might have a unique ingredients or materials list. For example, a line of candles where each variant is a different scent can have a metafield for Ingredients. The "Vanilla" scent variant's metafield would list its ingredients (e.g. "Soy wax, Vanilla oil, Cotton wick"), whereas the "Lavender" variant would list "Soy wax, Lavender oil…", and so on. This way, when a customer switches to a different flavour/scent, they can immediately see the relevant ingredient or composition details. This approach works particularly well with automated bulk editing tools to ensure consistency.
Variant-specific images or files
You can also use metafields to associate media or downloadable files with a variant. For instance, a furniture store might have a PDF assembly instruction that differs for each model variant – you could upload each PDF through a File-type metafield on the variant. Or if you want a unique image (beyond the standard product images) for each variant, such as a schematic diagram or a colour swatch, you could do so via an image URL or file metafield. Then use that metafield in your theme to display the content when that variant is selected. This is particularly useful for stores with complex products requiring detailed documentation.
Summary
Common uses for variant metafields include size-specific details (measurements for each size), unique ingredient lists (different ingredients for each flavor/color), and variant-specific files or images (assembly instructions that differ by model). A real fashion retailer increased conversions by 24% by displaying accurate measurements for each clothing size. When combined with Shopify automation tools, these metafields can be managed efficiently at scale.
These are just a few ideas – the possibilities are endless. The key is: if it's unique to the variant, variant metafields can probably handle it. By tailoring information at this granular level, you improve the customer's understanding of what they're buying (which can increase trust and conversion rates). This becomes even more powerful when integrated with your overall product management automation strategy.
How to show variant metafields in your Shopify store
After adding all these great custom details to your variants, you'll want to show them on your storefront so customers can benefit from the information. There are two main ways to display metafields in a Shopify store theme. I highly recommended doing this with custom liquid (don't panic, it's really straightforward). But first, a quick note on how you can do this in the theme editor.
1. Using the theme editor (no code needed)
If you're using an Online Store 2.0 theme (like Shopify's Dawn theme or any modern theme), you can connect metafields to sections or blocks in your theme through the visual editor.
Shopify's theme editor allows you to bind a dynamic data source to certain elements. For example, you might add a new text block to your product page and choose "Insert dynamic source", then pick your variant metafield from the list. The theme will then display that metafield's value for whichever variant is selected.
This can be the easiest method for simple cases: just point-and-click to get metafield content showing, no coding required. (Make sure to check that the theme section you're using supports the type of metafield you created – most standard types like text, number, image, etc., are supported in OS 2.0 themes.) I couldn't use this, so I went the code route, which (albeit I know how to code) is something even a beginner can do.
2. Using Liquid code in your theme
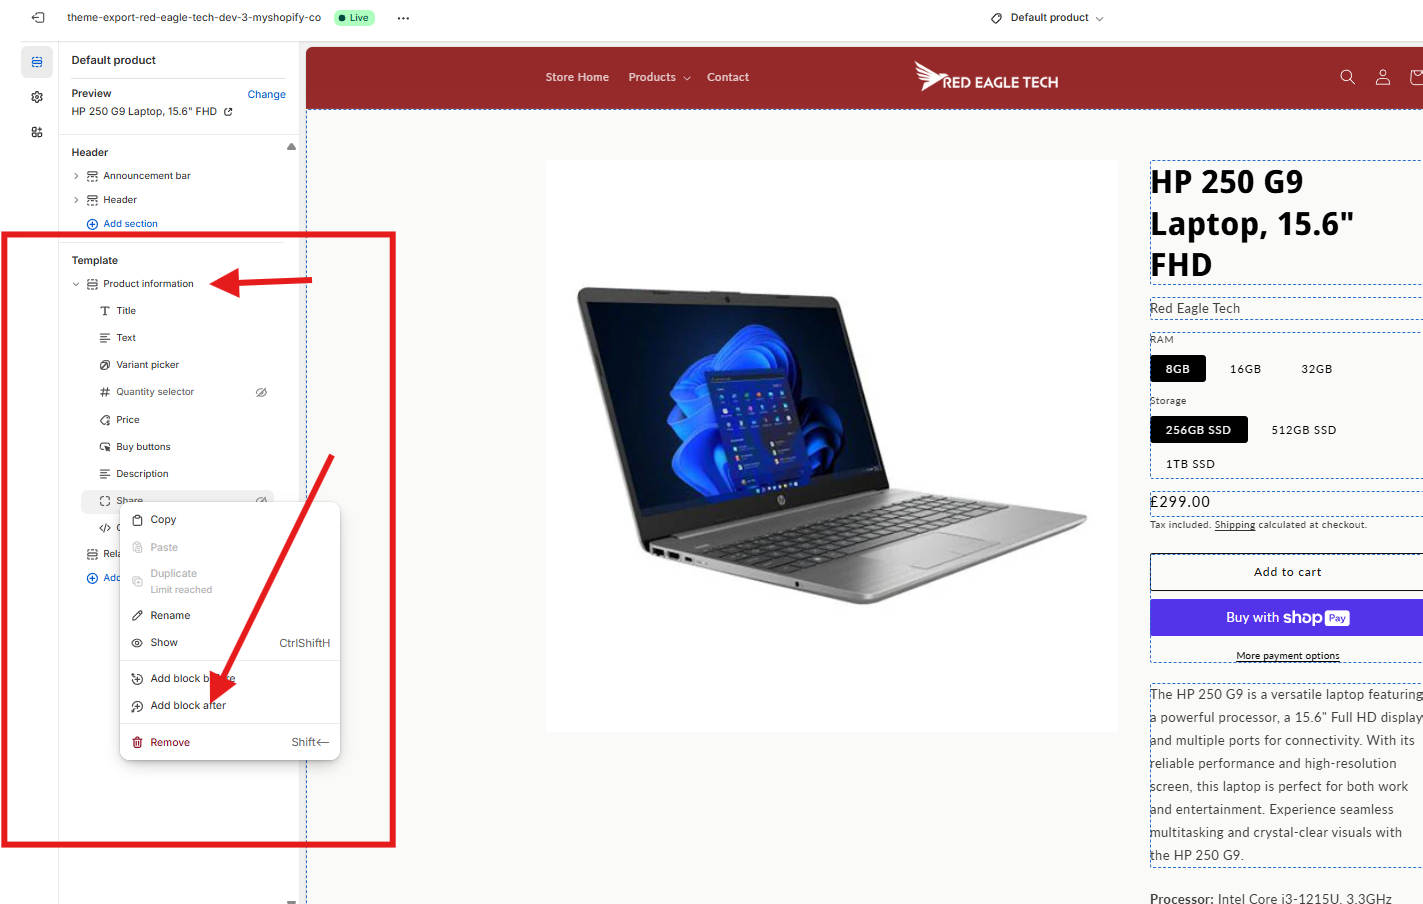
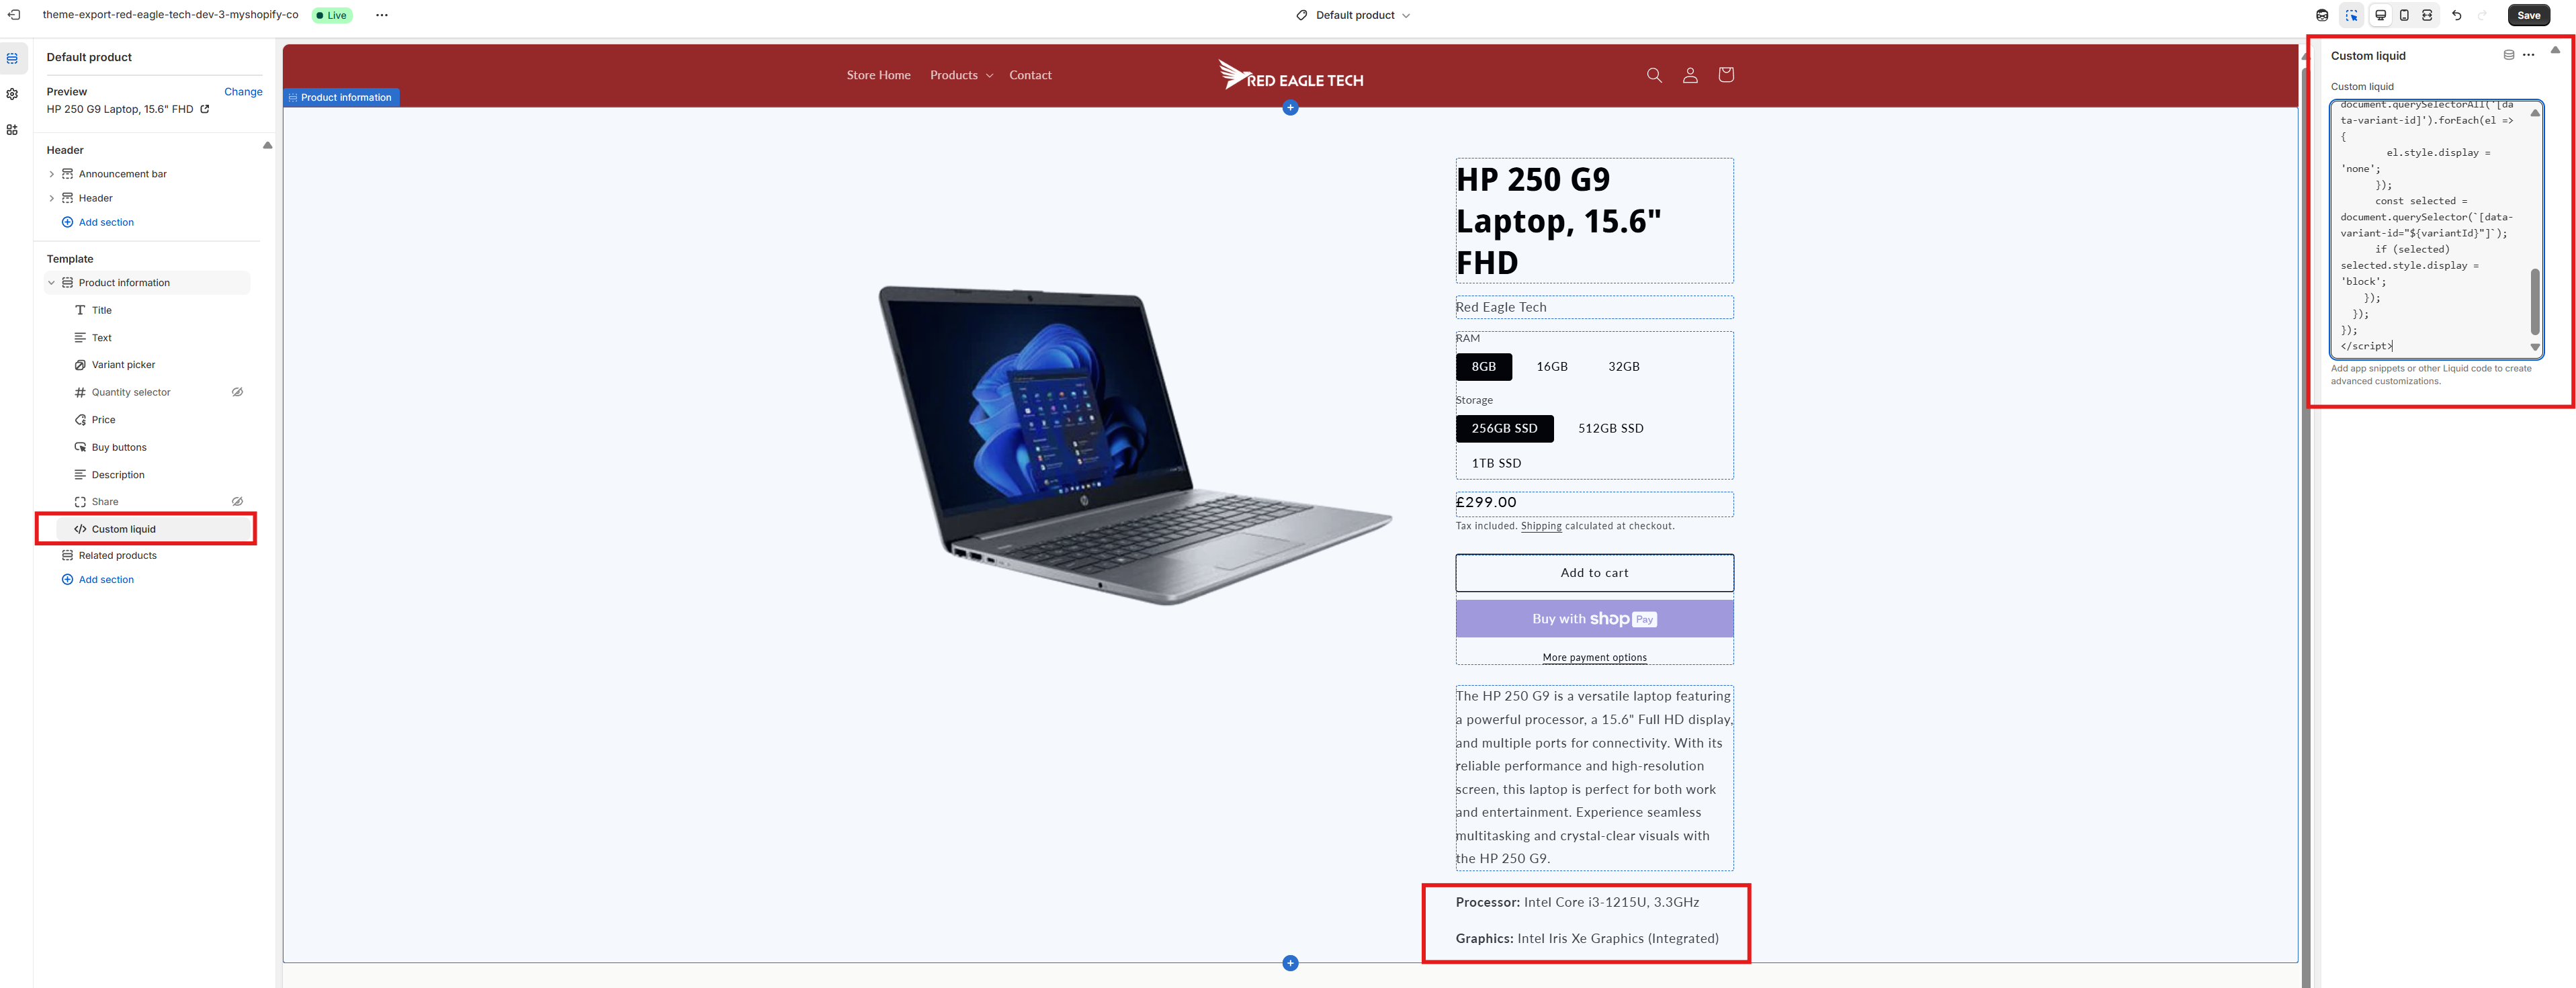
Implementation Method 1: Add a custom Liquid section
The easiest way to display variant metafields without editing theme files directly is by adding a Custom Liquid section in the theme editor under the Product Information:
- Go to Shopify admin > Online Store > Themes
- Click "Customize" on your active theme
- On a product page, click "Add block" (under product information)
- Select "Custom liquid"
In the Custom liquid content field, add code like this:
{% for variant in product.variants %}
  <div data-variant-id="{{ variant.id }}" {% if variant.id != product.selected_or_first_available_variant.id %}style="display:none;"{% endif %}>
    <p><strong>Processor:</strong> {{ variant.metafields.custom.processor }}</p>
    <p><strong>Graphics:</strong> {{ variant.metafields.custom.graphics_card }}</p>
  </div>
{% endfor %}

<script>
document.addEventListener('DOMContentLoaded', function() {
  const inputs = document.querySelectorAll('input[name="id"], select[name="id"]');
  inputs.forEach(input => {
    input.addEventListener('change', function() {
      const variantId = this.value;
      document.querySelectorAll('[data-variant-id]').forEach(el => {
        el.style.display = 'none';
      });
      const selected = document.querySelector(`[data-variant-id="${variantId}"]`);
      if (selected) selected.style.display = 'block';
    });
  });
});
</script>
How this works:
This code creates a dynamic display of metafields that updates when customers select different variants. Here's what's happening:
- The code loops through all your product variants ({% for variant in product.variants %}) and creates a container for each one.
- Only the currently selected variant's information is visible - the others are hidden with style="display:none;".
- When a customer selects a different variant, the JavaScript detects this change and shows only the information for that variant.
What you need to change:
- Replace variant.metafields.custom.processor with your own metafield using the format variant.metafields.[your-namespace].[your-key]
- Replace variant.metafields.custom.graphics_card with your second metafield
- Change the labels (<strong>Processor:</strong> and <strong>Graphics:</strong>) to match your metafields
- Add or remove metafield lines as needed for your product
For example, if your metafields use the namespace my_fields with keys material and weight, you would change those lines to:
<p><strong>Material:</strong> {{ variant.metafields.my_fields.material }}</p>
<p><strong>Weight:</strong> {{ variant.metafields.my_fields.weight }}</p>
When the page loads, customers will see the information for the default variant. When they select a different variant, the JavaScript automatically updates the display to show the correct information without reloading the page. This provides a seamless experience as customers explore different product options and is particularly useful for stores with complex products requiring instant product updates.
More advanced Liquid examples
Here are a few more examples of Liquid usage (which you can mix and match in your code as needed), particularly useful for those using Shopify automation UK solutions:
Displaying text or HTML stored in a metafield
If you have a rich text or HTML snippet stored (say a warranty info in a multi-line text metafield), you can output it like this:
{{ current_variant.metafields.custom.warranty_info }}
(where custom is the namespace and warranty_info is the key). It will render whatever content you've saved for that variant. You might wrap this in an {% if %} check as above to only show it when available.
Showing an image from a file metafield
If your metafield is an image or file, the value will typically be a URL. You can use it in an <img> tag or anchor tag. For example:
{% if current_variant.metafields.specs.schematic_image %}
  <img src="{{ current_variant.metafields.specs.schematic_image | img_url: '500x' }}" alt="Schematic for {{ current_variant.title }}">
{% endif %}
Here we assume specs.schematic_image is a File-type metafield containing an image. We use the img_url filter to resize it to 500px (you can adjust or remove that as needed). This will display the image specific to that variant.
Listing variant-specific data in a table or list
In some cases, you might want to show all variant info together – for example a comparison table of variants. You can loop over all variants and print each variant's metafield:
<table>
 <tr><th>Variant</th><th>Battery Life</th></tr>
  {% for variant in product.variants %}
   <tr>
     <td>{{ variant.title }}</td>
     <td>{{ variant.metafields.specs.battery_life }}</td>
   </tr>
 {% endfor %}
</table>
This would output a table listing each variant and the value of its "battery_life" metafield from the specs namespace. Only do this if it makes sense for your product page design (it could be useful for tech spec comparisons, for instance). Keep in mind that if you have many variants, listing them all might be overwhelming to the user, so use such an approach judiciously. This approach works particularly well when combined with automated product categorisation to ensure consistent data presentation.
When editing theme code, always remember to preview and test the changes. Make sure that the metafield output looks correct and that nothing appears for variants where a metafield might be empty. A well-implemented variant metafield display will seamlessly show the right info for the right variant, enhancing the product page without any manual intervention from you once set up. This is particularly valuable for stores using Shopify workflow automation to manage large catalogues.
Troubleshooting tip
If you don't see the metafield output on your storefront, double-check that you enabled it for storefront access (the setting from when you created the definition) and confirm that you're using the correct namespace and key in your code. You can find the exact namespace and key on the Metafields settings page under the variant definition. Typos or case-sensitivity issues will prevent the data from showing. When using bulk metafield updates, ensure all your variants have been properly updated.
Summary
Display variant metafields using either the no-code theme editor (for Online Store 2.0 themes) or custom Liquid code. The provided Liquid code example creates a dynamic display that updates when customers select different variants, showing only information relevant to their selection. This is particularly useful for stores using automated product management systems.
Tips and best practices for managing variant metafields
Now that you have the basics, here are some best practices to ensure you're getting the most out of variant metafields in Shopify, especially when combined with Shopify automation tools:
Use consistent naming
Create a clear naming convention for your metafields. Group related fields under the same namespace (e.g., specs.weight, specs.material) to keep your code organized and readable.
Choose appropriate types
Select the right content type for your data to improve validation and rendering. This gives you proper input UI in admin and ensures data integrity.
Set validation rules
Use metafield definitions to create validation rules and preset values. This keeps your product data clean, consistent, and error-free.
Pin frequent metafields
Pin metafields you edit often for quick access. They'll appear in a table right on the product page, saving time when managing multiple variants.
Test all variants
After setting up, check each variant on your storefront to ensure correct information displays. This helps catch configuration mistakes early.
Protect sensitive data
Be careful with storefront access settings. Avoid exposing sensitive information like cost prices or supplier details in customer-facing metafields.
Use bulk editing tools
For large catalogues, use Shopify's bulk editor or import/export tools to avoid tedious manual entry and reduce errors when managing many variants. Consider MeldEagle for true automation.
Keep content concise
Consider user experience when adding large amounts of data. For lengthy content, use downloadable PDFs or pop-ups instead of cramming text into metafields.
Use metaobjects for complex data
For reusable structured data sets, consider metaobjects instead of simple metafields. Perfect for information that appears across multiple products.
By following these best practices, you'll maintain a clean and efficient metafield setup that enhances your store and improves the customer experience. This becomes especially important when you scale your Shopify store and need to manage thousands of variants efficiently.
Summary
To effectively manage variant metafields: use consistent naming conventions, select appropriate data types, set validation rules, pin frequently-used fields, utilize bulk editing tools, avoid exposing sensitive information, test displays for each variant, keep content concise, and consider metaobjects for complex data structures. These practices become even more critical when managing large catalogues with Shopify automation tools.
Conclusion
Shopify variant metafields are a powerful way to enhance your product pages with detailed, variant-specific information. When implemented correctly, they provide several key benefits:
- Improved customer experience by showing precise information for each product variant
- Increased conversion rates through more detailed product information
- Reduced returns by setting accurate expectations about each variant
- Enhanced SEO through more detailed, variant-specific content
- Better inventory management with variant-level custom data
As you implement variant metafields, always keep the customer experience in mind – present the information in a clear and helpful way that enhances understanding and drives purchase confidence. The extra effort to set up and maintain variant metafields will pay off through increased conversions and customer satisfaction.
For stores with many products and variants, consider automating your Shopify product management to save time and ensure consistency across your catalogue. With the right tools like MeldEagle, you can manage variant metafields at scale without the manual overhead, allowing you to focus on growing your business rather than data entry.